A wood fence stain can restore the natural colour of a fence and protect it from further deterioration. It is a much thinner product than paint, and is applied with either a sprayer or a brush.
Make sure to stain the fence in weather that is not too hot or too cold. It is also important to prepare the surface properly prior to staining.
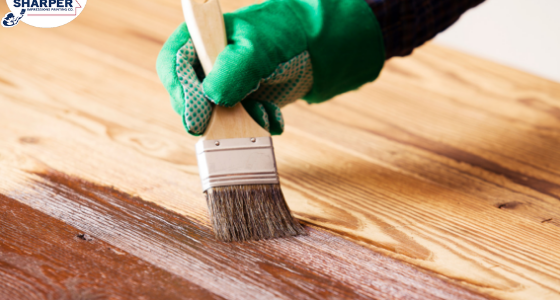
Deck Staining Tips
Staining your wood fence or deck is an important maintenance item that will help extend the life of your home’s outdoor structure. By acting as a barrier to moisture and other environmental factors, staining helps prevent damage such as warping, cracking, and discoloration. In addition, staining helps inhibit the growth of unsightly mold and mildew that can tarnish the appearance and compromise the structural integrity of your outdoor space.
When choosing a stain for your wood fence or deck, there are several options available, including oil and water-based. Both offer unique benefits, but it’s important to select a high-quality product that will protect your investment and last for many years to come. A quality oil based stain uses penetrating oils that will absorb into the wood, preventing it from drying out and becoming brittle over time. Additionally, oil stains offer superior durability and color retention when compared to water-based products.
Before starting the staining process, be sure to thoroughly clean your wood fence or deck surface. You’ll want to remove any dirt, dust, or debris that may have collected on the surface and ensure that the area is free of any mold, mildew, or oil stains. If necessary, you can use a chemical-based stripper to effectively remove any stubborn stains or preservatives from your wooden surface.
Once your deck or fence is ready for staining, it’s a good idea to work in the shade during the cooler hours of the day. Working in direct sunlight can cause the stain to dry too quickly, resulting in uneven absorption and patchy or streaky results.
When applying the stain, make sure to work in long, even strokes. It’s also important to back brush your surface, which will help the stain absorb into your deck boards. Back-brushing will also eliminate any drips or runs that may occur on your deck or fence surface.
Be sure to follow the instructions and safety precautions on your specific product, as well as the Technical Data Sheet or Safety Data Sheet for detailed application instructions. Also, be sure to test your stain in an out-of-the-way area of your deck or fence to determine whether it is water-based or oil-based. If your deck or fence was previously stained, you can use a deck stripper to test for the type of stain that was used.
Finally, be sure to allow your wood stain to dry completely before placing any furniture or hanging items back onto the surface. Once the stain is fully cured, it will have a smooth, dry texture that will resist wear and tear. You’ll know that your stain is fully cured when it no longer feels wet or tacky to the touch. If you’re unsure of how to properly stain your deck or fence, contact a professional staining contractor for help and tips.
Fence Staining Tips
Staining a wood fence can be a big project. It’s not a one-day job, so spend some time planning how you’ll approach the task. Set aside the day free from rain or high humidity levels, and choose attire that can stand up to a few stain drips (old vacation t-shirts or ripped jeans are ideal). Before beginning, clear the landscape of plants, furniture and grills that may be affected by drips during the staining process. Protect these items with plastic drop cloths or canvas cloths.
It’s a good idea to test the color of your chosen stain in a small, hidden area before committing to a full coat. This will help you gauge whether the color is what you want and need, or if a darker or lighter shade would be better. The swatch will also allow you to spot any lap marks or uneven application areas before you apply the stain all over your fence.
When choosing a stain, keep in mind that the type of wood will impact how well it absorbs and holds the color. For example, walnut, cherry and mahogany have smaller pores and can be difficult to stain with water-based products. On the other hand, pine and cedar are more absorbent, making them ideal for oil-based stains.
In addition to the right stain for the type of wood you’re working with, consider a product that offers an extra level of protection, such as a sealant. This can be especially important if you live in an area with high moisture levels and/or a lot of sunlight. Stains that don’t include sealant can be vulnerable to moisture damage, and some colors are prone to fading over time.
Once the weather has cleared and you’re ready to begin, prepare your staining equipment and lay down a cloth or drop-cloth in the area where you plan to work. If you’re using a sprayer, carefully follow the instructions on the can to maintain an even distance between the wood and the nozzle. Otherwise, use a brush or wide roller for individual pickets and close-set posts. A natural or synthetic bristle brush works best for both oil- and water-based stains.
When applying the stain, work in an up-and-down motion, overlapping each previous pass to prevent dry spots and uneven coverage. Be sure to stain the tops and bottoms of each slat, and don’t forget to coat horizontal and vertical slats separately. Lastly, remember to clean your tools between each use.
Finally, be sure to apply a second coat as recommended by the manufacturer of your stain. This will ensure an even, dark finish and increase your stain’s durability. A second coat is especially important if you’re working with older wood that tends to be drier and more absorbent.
Wood Staining Tips
Wood decks and fences are beautiful additions to a home, elevating your outdoor living experience with an added sense of elegance and functionality. However, like any structure, they are prone to wear and tear due to constant exposure to elements such as sunlight, rain, and harsh winter temperatures. Fortunately, you can help protect these structures by regularly staining them to create a protective barrier. Staining your deck and fences is a relatively easy, inexpensive DIY project that can keep them looking fresh and beautiful for years to come.
To stain a wood fence or deck, start by removing any dirt, mildew, or debris that has accumulated on the surface. A simple sweeping should suffice, but for tough spots, a gentle cleanser made for outdoor wood surfaces can be used to scrub away contaminants and dirt buildup. Once the area is clean, a hose should be used to rinse off the cleaner and allow the surface to dry completely.
Next, decide what type of stain you will be using. Diane likes 100% acrylic stains because they are water-based and can be easily cleaned up with a hose or bucket of water. She also recommended a tung/linseed oil stain that can be tinted or left clear for a rich finish, especially on cedar. Jon prefers a semi-transparent stain for decks and fences that allows the natural beauty of the wood to show through.
Once the type of stain is chosen, it’s important to test the color on a small section of the wood. This helps ensure that the color will look good once it is applied to the whole surface and eliminates any surprises down the line. Jon also recommends using a mildew remover, such as Natura Mildew Off, to kill any mold and mildew that may be present on the surface before beginning the staining process.
When applying the stain, it’s important to work in a well-ventilated area and to wear rubber gloves. Depending on the stain you choose, some can be toxic if inhaled or ingested, so you want to ensure that you are working in a safe environment. Additionally, be sure to have any necessary materials on hand such as painter’s tape, a paint tray, plastic to cover surrounding areas, and a variety of brushes (including foam or cellulose/polystyrene fibers) to get the best results.
Finally, be sure to follow the stain manufacturer’s instructions for application techniques and drying times. It’s also important to avoid walking or placing objects on the newly stained surfaces during this time. If done correctly, staining your wood deck or fence will prevent damage, extend their lifespan, and protect your investment for years to come.